The battery isolator is very similiar to the battery switch in that it can charge two batteries and yet isolate the two.The difference being that there is no manual switch to operate using the battery isolator, its all automatic. There is pros and cons to both setups, with the battery isolator you have only one battery for the engine and one auxiliary battery for normally cabin use. Both batteries are charged by the engine and when one battery is discharged it will not drain the other. An isolator is basically a diode, a one way path through a circuit. There are different setups as with the battery switch such as dual engine installations and isolators that will charge more than two batteries. The battery switch can be manually switched between batteries to charge or start off from one or both batteries, where the isolator cannot.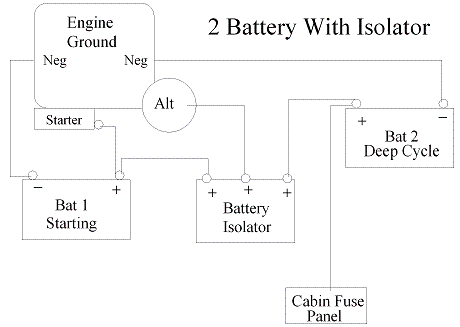
[expander_maker id=”2″ more=”Read more” less=”Read less”]This is the most common setup for a single engine dual battery boat. The way that the isolator is installed would be to disconnect the large charging wire from the alterntor, normally orange or red in color. This wire would normally attach on the other end at the starter where it would find its way back to the battery via the battery cable for charging. This wire would be capped off and taped back into the harness. Now a new wire (red or orange) of the same gauge, normally about an 8 gauge would be attached to the alternator and routed to the common on the isolator. Then the two remaining posts on the isolator are attached with the same gauge wire and routed to each positive end of the batteries. Route all wires out of the way of belts, and tie off the best as possible. This is all that is needed for installation. Now one battery can be attached to the motor as normal, ground at block and positive at the starter. The other battery(normally deep cycle) will need to be grounded at the engine and the positive ran to the cabin fuse/breaker panel for lighting or other 12v use. Note: Blue Water Marine is not liable for damages caused by improper installations or repairs. The information on these pages are for “information only”, not to replace manufacturers instructions. These pages are meant for helpful knowledge for the do-it-yourself, if you are not confident in what you are doing please leave the work for the experienced.As with battery switches there are several different manufacturers of isolators available.
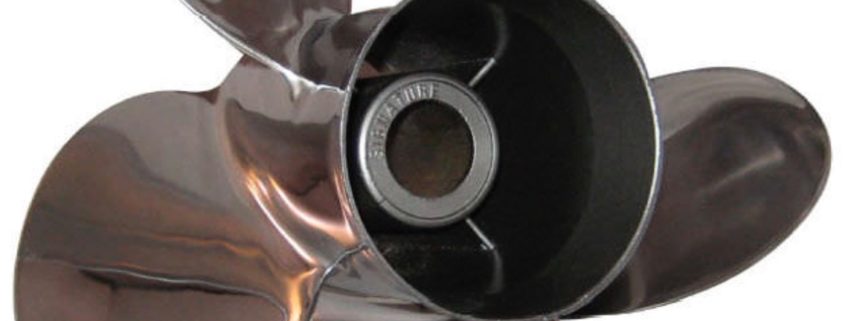
Choosing the correct prop for your boat can mean the difference between a well performing motor, and an engine that is low on power which is lugging or over revving. A lugging or over revving engine will eventually fail to engine damage. The prop must be for the proper application, be it an outboard, inboard, or I/O, a noticeable differences being the hub design, hub diameter, and spline.
The most important features of the prop is the diameter and pitch, as this will determine the rpm of the engine. It is very important that the engine operates in the proper rpm range of the engine determined by the manufacturer. For a proper rpm test an actual water test will need to be performed. The engine will need to be run up to full throttle operation and trimmed for optimum performance. The tachometer must be in proper operating condition for making the correct choice of prop. The motor must not be allowed to over rev. Once the rpm is determined the correct prop choice can be made. If the engine is over revving, a higher pitch prop is required, and if the engine is running at a too low of a rpm a lower pitch prop is needed to bring up the rpm. The more pitch in a prop the more water the prop will move in one revolution of the prop. A 2″ change of pitch will in most cases change the rpm by 300-400 rpm. Engines normally can use two different pitch propellers, say a 19p and a 21p and stay in the operating rpm range. The lower pitch prop would be considered a power prop as it will run at a higher rpm and have much more torque, which is good for heavy loads or sking. The higher pitch prop would be considered the speed prop as you would loose your bottom end (torque) but gain on speed as you would be pushing more water at the same rpm. A prop for example, 14 1/2 x 19 would have a total diameter of 14 1/2 inches and a 19 pitch. [expander_maker id=”2″ more=”Read more” less=”Read less”]
Now the question, aluminum or stainless steel? There is pros and cons for both. The aluminum prop is a good economy prop, as the price is within reason for the average boater. It will have some flex and can be damaged easily. But on the other hand minor repairs are cheap, and if you hit something hard you are more likely to damage the prop verses something in the gearcase. Now with a stainless prop which is much more expensive there will be less flex and better performance, but with a stainless prop if you hit something damage to the gearcase is more likely to occur.
The last thought that may come to mind is a 3 blade or 4 blade prop? A three blade prop does quite well for normal use, but you may consider a 4 blade if you are having problems with blow outs, ventilation, or cavitation. A four blade prop will give you a much better hole shot, less slippage, but the top end will not normally improve and with a possibility of dropping a few rpm. Performance boats and bass boats are good candidates for this prop.
With todays fuel it is more important than ever before to be aware of the issues that arise in the marine engines. With todays modern engines the issues from the present are different than the engines from the past. With the computer controlled engines ignition problems are becoming less of a problem compared to fuel.
With the alcohol in todays fuel, water is literally pulled from the air and into the fuel. For a test, an open clear container such as a jar with an inch or two of gas poured into it can be left on a bench for a few hours on a humid day. You will be surprised to see the fuel getting cloudy or on real humid days a seperation of fuel and water. Now think about fuel tanks in boats and the condensation issues that can happen on warm humid days and the cooler area of the bilge where the fuel tank is.
Also there are the problems with plastic fuel tanks, fuel lines, primer bulbs and rubber fuel components that the alchohol likes to destroy. This leads to more expensive fuel systems that have to be EPA compliant. The portable plastic fuel tanks seem to always have venting problems, either not venting at all or every time it rains you get water in your fuel. [expander_maker id=”2″ more=”Read more” less=”Read less”]
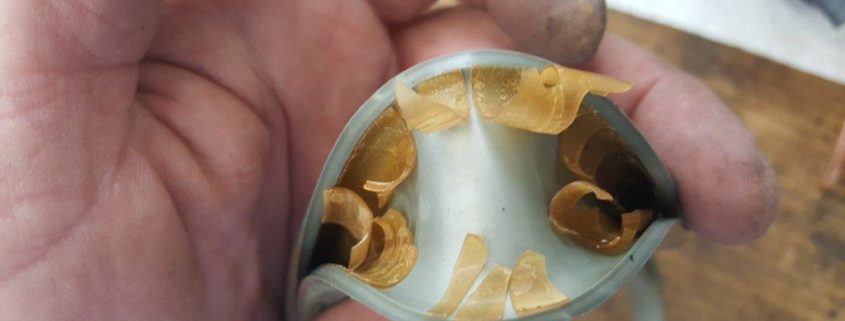
So, now we have fuel lines coming apart from the inside leaving huge chunks as in picture, or tiny pieces of rubber in your fuel system plugging things up which can lead to costly repairs. These pieces can find there way into carburetors, and fuel injection systems alike.
To avoid these problems ensure you have an EPA compliant fuel system! You want to do this now, not when you are having problems. This is most important in older boats! Also an inline fuel / water filter system is installed between fuel tank and the engine. Change out this filter yearly! Fuel connectors can suck air if fuel lines become hard or orings in the connectors hardens. Replace as needed.
Old fuel looses its octane and varnishes over time, its best to not leave fuel in tanks if they are going to be sitting for extended period of time (years). Its also a good idea to run a marine fuel stabilizer the entire season which helps to keep the fuel fresh and less likey to asorb water.
Take a little time and go over your fuel system as this may keep your boat out of the shop and more time on the water!
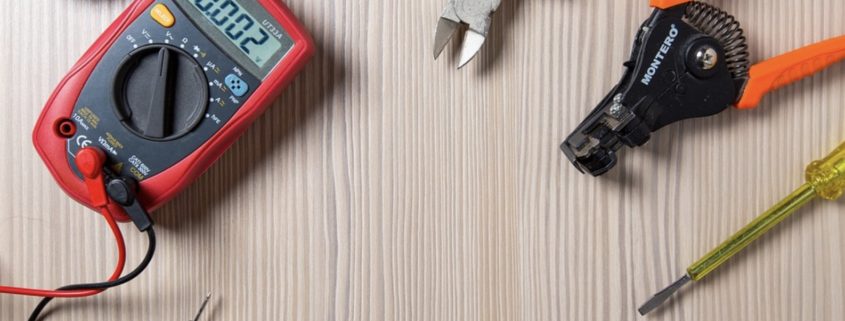
Making a good electrical repair or correctly installing electronics on your boat can make a huge difference in the longevity of the project. The correct tools and proper materials will make for a quick and long lasting repair or install. With a good test light tracking an electrical problem is quite easy whether its in the bilge, under the helm or within the gunnels. When installing a new depth sounder, marine radio, bilge pump, horn, radar, ect with all the right stuff the job will be easy. Tools and materials needed for most repairs and installations include, basic hand tools, a 1/2 inch drill, 3/8 cordless drill, a set of drill bits, assorted hole saws, crimper/wire stripping tool, double stranded wire, assorted connectors, electrical tape, fuses, fuse holders, silicone caulk, test light, soldering gun, solder paste, tie straps, misc. stainless screws, side cutters and shrink tube. Depending on the project one or more of these will be needed. All electrical and electronics require that they be fused or go through a breaker, also the proper gauge wire will be needed. A good battery ground is a must to ensure good current flow and help reduce static noise on the radio equipment. [expander_maker id=”2″ more=”Read more” less=”Read less”]
The best setup to run electronics from the cockpit area is to have a fuse or breaker panel to tap off from. If there is no panel one should be installed. A red(pos) and black(neg) in a 8-10 gauge wire should handle most boats, and should be fused at the battery with a 30 amp fuse. Then each individual electronic item can be wired seperately from the fuse box with the appropriate fuse/breaker. Running a new wire back to the battery for each electronic item will lead to a messy install as well as being more prone to electrical problems. Most electronics and electrical items will use a 16-18 gauge wire.Stripping the wire and twisting it together and a little black tape is “not” a good repair. For most cases using connectors and a good crimping tool is all that is needed. In a wet enviroment such as the bilge area or at the battery, soldered connections are best and will last a long time. Making soldered connections through-out the boat will ensure that there will be no electrical problems. Using shrink tubing over the soldered connections will give a nice appearance and protect from shorting. Electrical tape should be used as little as possible and used only when needed. Tie-straps will keep your electrical wiring looking tidy and out of the way.
Petroleum jelly is a product that can help keep electrical components working and free from corrosion. Boat running lights and the stern light socket are very prone to corrosion and it is the corrosion that is the main problem with lighting failures. A small amount of petroleum jelly on the contacts and the gounding portion of the light bulb will keep the light socket from corrosion. Trailers lights and the trailer harness plug will benefit also. The vehicle trailer plug is a good idea too as it corrodes as well. Fuse holders and fuse blocks could also use a little protectant..When installing new electronics or replacing an old one, take your time and read the instruction completely. A mock setup is always a good idea as to make sure it does not interfere with anything else. Also it is a good idea to check the other side if you will be drilling to make sure there is nothing in the way or if there is enough room for access if needed. Think twice and drill once is a good rule to follow. A good silicone caulk should be used where needed such as drilling through the transom, and always use a philip head syle stainless screw for installations. The philips head holds a screwdriver much better without sliding out. Take your time and you can do a professional job!